I seem to be getting a lot of questions recently asking when the Progression Kitefoiling Tacking videos are coming. For now, there are definitely plans for in-depth premium tacking videos, they are coming. At the moment I am spending my time working out every part of all 4 tacks and figuring out the best way to teach them; both in person and in future videos. So, for now, I’ll be releasing shorter one-off tip videos on YouTube and socials, along with blog posts like this one. My main goal here is to help guide those of you learning to tack, give you tips to point you in the right direction, along with some quick tips for each tack.
To kick things off, part 1 is all about understanding the overall concept of tacking and answer these common questions:
- What are the four main tacks and how do they differ?
- What is the one key technique they all share and most vital to understand?
- Does tacking on a surfboard help?
- What order to learn the tacks in and where the 360 fits in?
- What are the best conditions and equipment for your first tacks?
What are the Four Main Tacks?
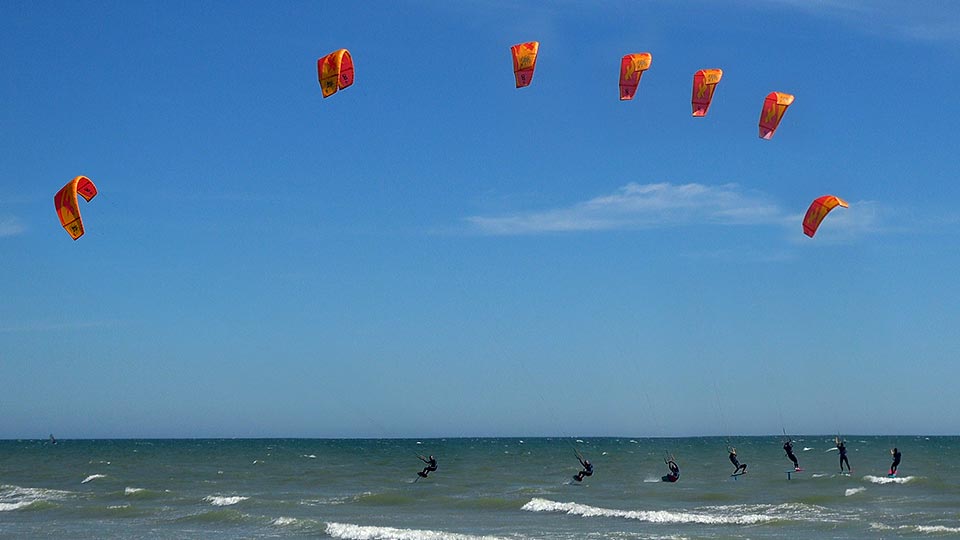
First things first, what is a tack?

In its most simple form, it’s when you change direction and the nose of the board goes through the eye of the wind. So you carve upwind, the nose points directly into the wind and then it points away from the wind. Any technique that does that is effectively a tack but there are 4 core variations that you can focus on and are the basis for other tricks you can learn after.
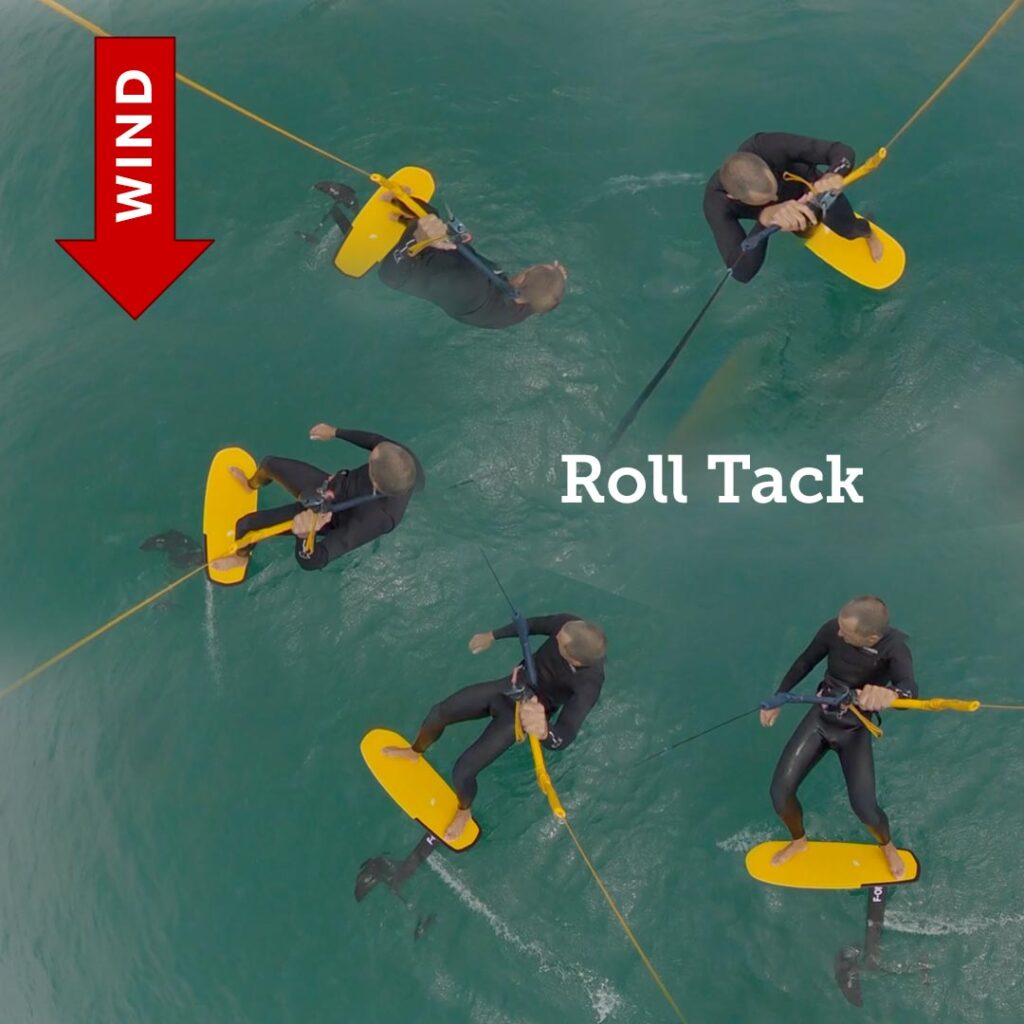
Roll Tack
This is the classic racing tack, also called the duck tack because you “duck” under the lines. It requires a foot change mid-carve and you are always facing into the wind, so your body does a frontside rotation. It allows you to maintain speed throughout, go strap to strap, and always see where you are going.
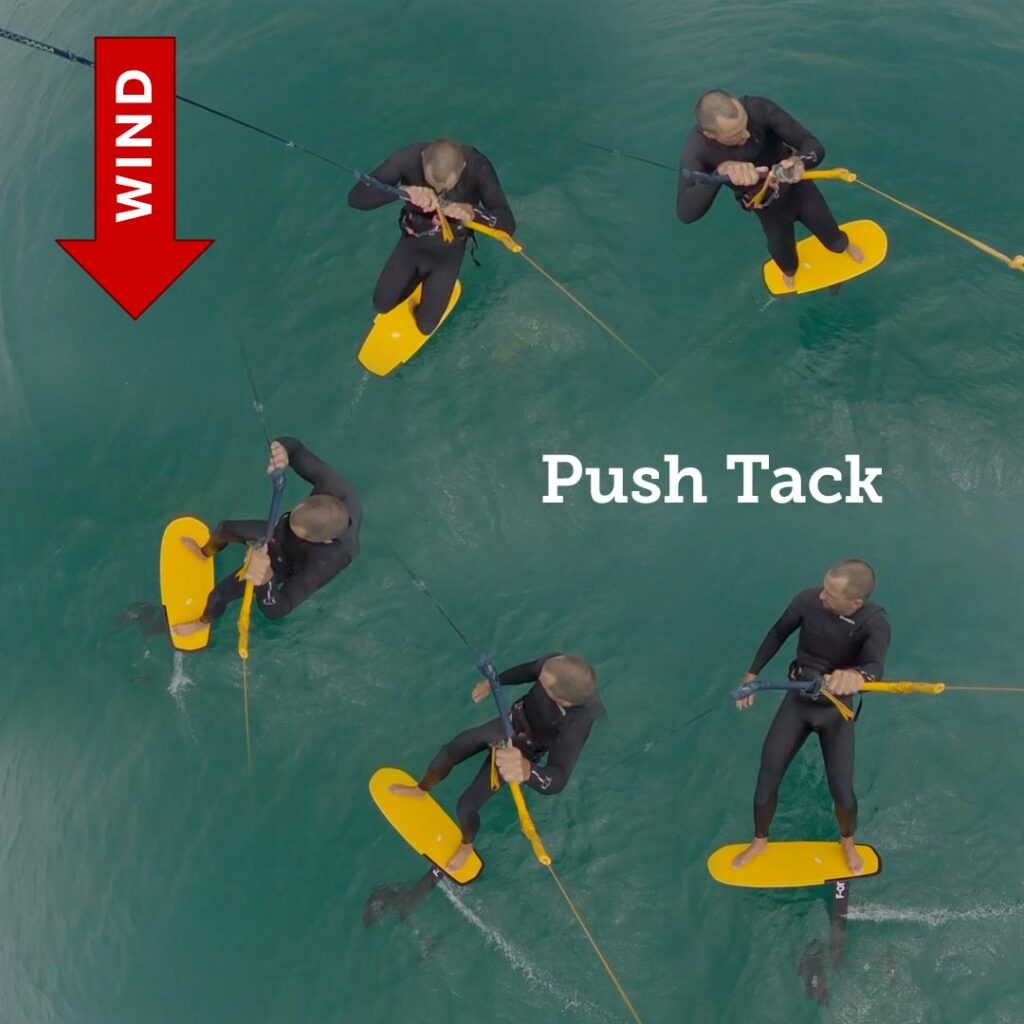
Push Tack
This is the opposite body rotation to the roll tack. It also requires a foot change but here you turn your back on the direction of travel, performing a backside rotation. This tack requires you to cross your feet and so is not suitable for those using straps. and is often a tack that strapless surfboard riders may have already learnt.
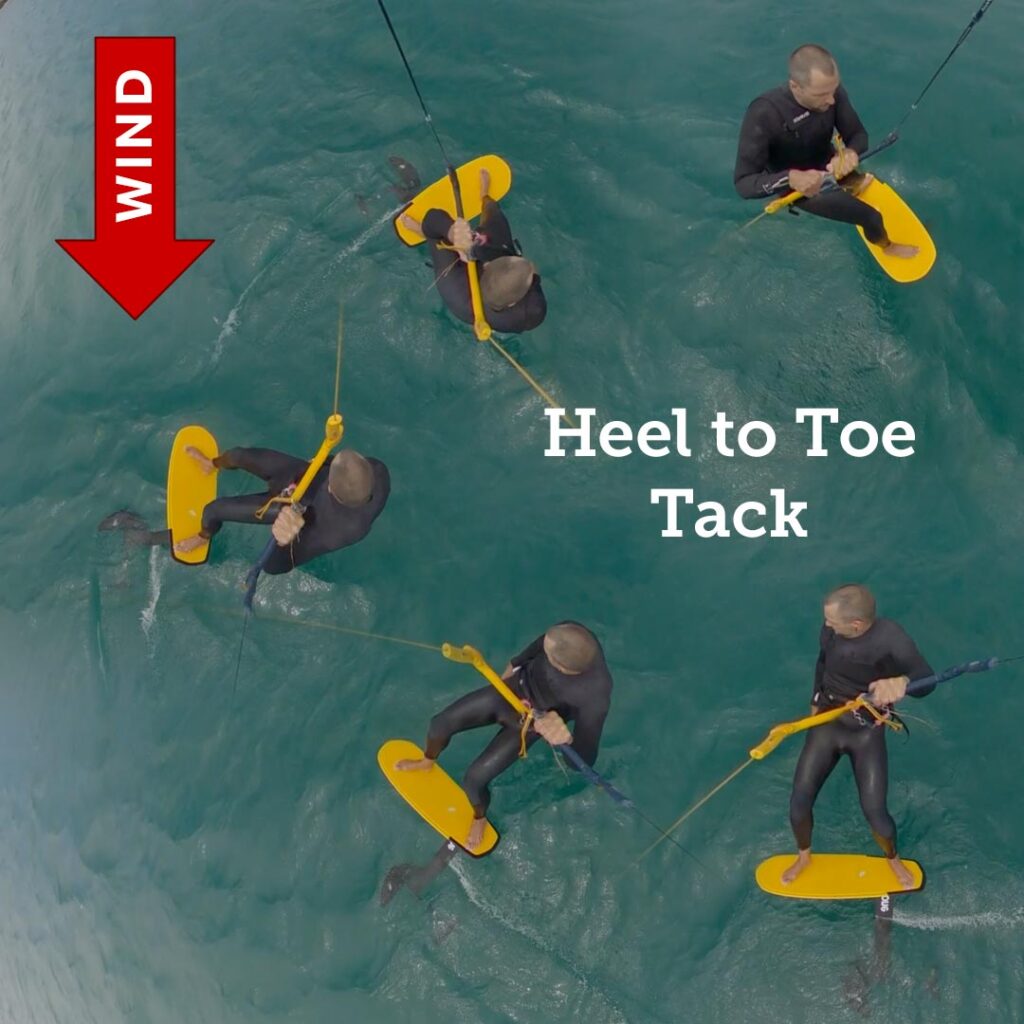
Heelside to toeside Tack
Here you don’t have any foot change, we ride in on our heelside and carve upwind much like the Roll to push tack, but then twist your upper body so that we can come out riding on our toeside. The first half is very similar to that of the standard 360.
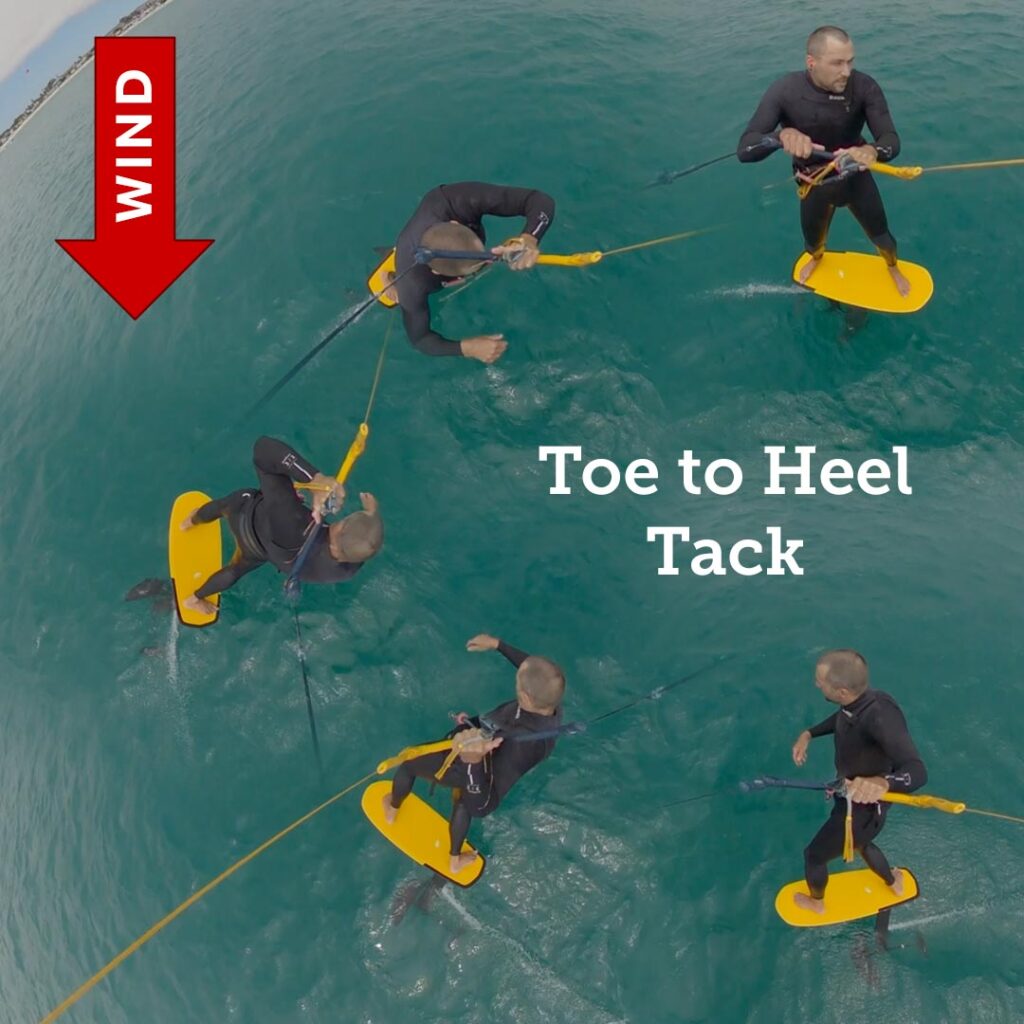
Toeside to Heelside Tack
Again no foot change required here but we start riding on our toeside, carve upwind and then what is for most people, a more difficult twist of the body to get the bar and lines round in front so you can come out on your heelside. This one can be hard to get your head around, but feels amazing when you have it dialled in!
Now we understand there are 4 different tacks, we’ll look at some similarities in technique but we come back to each of these tacks and give you advice and tips on which ones might be best for you to try first.
The Most Important Technique to Learn
Yep, you guessed it, it’s the kite! It will come as no surprise that the kite movement is the first thing you have to master if you have any chance of getting around any of these tacks dry. The great thing is that once you truly understand how the kite moves through each stage of the tack, then it is essentially the same kite and bar movements for all 4 of the tacks (with some small additional tweaks here and there).
In a gybe, the kite is pulling us downwind, through the carve. The bonus is we can see the kite all the time, which helps with getting the kite positioning right.
In the tack, things are more complicated because the kite flies overhead so we can’t see or follow its progress. It all comes down to feeling the kites position. But the similarity to the gybe is that the kite is still leading us through the upwind carve – if we get the kite position correct!
Ultimately you are trying to get the kite directly overhead BEFORE you start carving upwind. This way the kite will fly with you, as you carve upwind, and then as you rotate your body (with or without a foot change), you’ll be rotating directly under the kite, with upwards lift keeping you correctly balanced over the board and foil.
The most common mistake is carving upwind too soon, with the kite still rising, you tension the lines, the kite then resists wanting to pull you downwind and you want to go upwind.
Now I’m not going to go into detail on this kite movement here but thankfully I’ve already covered it in quite a bit of detail somewhere else…
Does Tacking on a Surfboard Help?
Yes, it does, 100%. There are small differences in some of the body movements and the nature of the foil means mistakes can become more exaggerated but as far as the kite and bar movements go, it’s essentially the same. So it’s kind of lucky that Episode 6 of KiteSOFAing looking at Tacking, laser-focused on the kite movement. It’s centred around the surfboard version but I show and discuss how similar this is to the foiling version.
If you are learning to tack this is essential viewing:
And though you can learn to tack straight away on your kitefoil, some people will find learning on a surfboard easier because it can be more forgiving. And it’s nice to have a common technique you can practice on your surfboard on days when it’s not suitable for foiling.
What order to learn the tacks in and where the 360 fits in?
Your other kiting experience will have an effect on which tack you may find the easiest to learn first, along with the conditions you ride in, your style of kite and foil.
The 360
One thing we have discovered is that most people find learning the 360 the easiest first step. Ok, it doesn’t actually allow you to change direction, as you ultimately end up riding back in the same direction, but the kite movement for the first ⅔ of the trick is the same as the tacks.
If you have yet to try the 360 or are still struggling to get that mastered, it’s a good place to focus on. Thankfully I have a good video that focuses primarily on the kite and bar positions:
Now, just because you might put most of your energy into the 360 to start with, that doesn’t mean you can’t start trying some of the core tacks too. There is no right or wrong order to try them, but here are some pros and cons for each to help pick one to start on.
1. Heel to Toe
- Often best first step, particularly if you have started learning 360’s.
- Effectively you kick out halfway through the 360 before you loop the kite.
- The entry feels natural as you are just carving upwind on your heelside.
- The main difference to the 360, is working out how to get your weight back up over the board, forward and the required twisting of your upper body to get into the toeside position.
- Practising beach drills to get the timing for the body movement in relation to the bar and kite can really help.
2. Push Tack
- Good cross over for those who already can do it on a surfboard
- Riding strapless – if you have straps, the push tack is near impossible to do smoothly as the body rotation has you heading into the straps.
- Used to be less popular before larger foils became common place. A medium or large foil – 800 sq cm2 or greater makes this far easier as you can lose speed but keep the foil gliding. Once you have the knack, then any foil is possible but learning on a small foil or performance wing is not ideal.
- The backside rotation allows you to keep tension in the lines by swinging out over the nose of the board. This tack allows room for less finesse and therefore, a higher success rate early on!
3. Roll Tack
- One of the most technical tacks due to the need to duck under the lines and that can mean you lose tension/lift from the kite. You often see people who are learning to roll with their legs are bent up under them and their butt nearly sitting on the board.
- Many people may try this first because they are riding in straps and particularly if they are riding on race or performance foils and kites.
- Requires the best kite control – sheeting out, and then back in, at just the right moment can be critical The devil is definitely in the details with this one!
- It is a tack that is made a lot easier when you are riding foil kites, that generate way more prolonged lift by simply sheeting in.
- Remember this is essentially a foot change mid carve. If you can’t foot change riding in a straight line then throwing one into the middle of a turn is making life even more difficult for yourself. Working on your standard foot change will definitely help with the roll tack.
4. Toeside to Heelside
- This one comes last but it’s by far my favourite! Nothing feels better than Toe to Heel tacks!
- It is difficult because you have to carve upwind on your toeside, something that we don’t usually do.
- It also feels odd to shift your upper body so you are facing away from your kite and to a position where it can feel like your bar and lines need to be behind you!
- But once you understand the movement it will feel completely normal.
- This tack is the one that is hardest when you are powered or overpowered as it can be hard to keep weight over your toes as you carve upwind, so best to save learning this one for when you are under or moderately powered up.
And because it’s one of my favourites, it’s actually the video I am working on next so keep a lookout on Youtube and socials. I have a little trick to tell you in this video that I promise will change everything, and speed up your progress x10. I can’t believe it’s taken me this long to spot it, but it is the secret that is gonna get everyone toe to heel tacking this summer! You won’t be waiting long for the video I promise!
[UPDATE: The video is out]
What are the Best Conditions and Equipment for Your First Tacks?
Not all conditions are as easy as others for learning to tack. Seeing that all the tacks are probably going to be some of the most complex techniques you’ve attempted on your foils, you might as well pick your battles and focus on tacking when the conditions are best.
- Tacking is easier to learn moderately powered up. In very light winds, tacks are super handy but you’ll need your technique to be spot on to get the lift required throughout the manoeuvre. In strong winds, you will be on smaller kites and though you will have lift, smaller kites (6m and lower) generate lift for less time. You might find you get a surge of lift and then it goes before you can complete your tack.
- 8-10 metre kites are great for learning, giving a good compromise of lift and speed of flying, helpful on the exit.
- Foil kites are very helpful for tacking, due to the prolonged lift they offer and will open up the lighter wind locations.
- Flatter water makes a big difference. You can carve hard into the turn with less chance of a wingtip popping out and also there’ll be less turbulence under the water. This will give you more stability as you make your foot changes and body movements.
Conclusion
I hope this has helped to give you some background into everything tacking related, along with some ideas of where to get started with your tacking journey. There is no right or wrong path, the most important step is just trying your first tack, whichever one that might be. Try, make some mistakes and then work on it from there. Focus on one or two tacks (along with the 360) and every time you crash just think – what did I do with my kite and bar, as more often or not, that is where the problem lies!
Keep your eye here on the Progression blog, along with our YouTube, Facebook and Instagram channels for short and long-form videos that relate to all these tacks.
As always I’d love to know how you get on, any tips or alternative views points are always encouraged :-D